Showing posts with label macaron cupcakes. Show all posts

April 29, 2013

SALTED CARAMEL CHOCOLATE CUPCAKES WITH PORT WINE MACARON

No comments:
Salted Caramel Chocolate Cupcake

Whew, that name is a mouthful. A delicious one!

One of my current favourite flavours is salted caramel. I know, I know, its been done to death but its sooo good!

Salted Caramel Chocolate Cupcake

These decadent chocolate cupcakes are filled with a homemade salted caramel sauce and topped with a salted caramel buttercream. Mmmm.

So, as you might suspect, caramel can be tricky. I burned two batches! That's four cups of sugar down the chute and a whole lot of pot scrubbing. I finally made a good batch by NOT trusting my thermometer but by trusting my eye. My sugar was burning within seconds of colouring and my candy thermometer was not reading the temperature fast enough. Therefore my recipe reflects this less technical yet much less burny approach.

Chocolate Macaron Edible Flowers

I knew I wanted to make a chocolate macaron for this chocolate cupcake and decided on a port wine ganache because 'A', google told me port was a good pairing for chocolate and caramel, and 'B', I had a bottle in the cupboard.

I really enjoyed planning out the decorations for all of the Paris-inspired cupcakes. Ensuring they would all have different yet complimentary colour stories and styles. For this cupcake I knew I wanted it to have a purple element to offset the rich chocolate brown. 

Edible Dried Petals

I love using these edible flower petals, they are gorgeous, rustic, imperfect and natural. They also impart a lovely floral scent. 

The petals I used are from Epicure Selections, unfortunately this product has been discontinued. I guess I will have to grow my own garden of edible flowers before this jar runs out. First step, obtain a house with a yard. In Vancouver? Oh dear.

The chocolate discs are a super easy and chic decoration. I actually used Candy Melts because I have not attempted the wizardry that is tempering chocolate. Candy Melts are a total cop-out but they honestly don't taste that bad. I only use them for small decorations and would never, ever use them in a recipe, like a ganache, cake or mousse. That would be sad.


To make the chocolate discs melt 10-15 Candy Melts in the microwave at 50% power for about 1 minute and stir to completely melt.


Spoon the melted Candy Melts into a small Ziploc bag, clip a very small hole at one tip and pipe small 1 cm mounds onto a strip of parchment paper.


Lay a second piece of parchment on top of the mounds. Use your finger to press down and spread out the chocolate into even circles. Set aside until hardened, about 20 minutes. Peel back your parchment to reveal your beautiful discs.

Chocolate Discs


For the gold dusting I simply brushed edible gold luster dust onto the discs with a dry paint brush. Easy peasy. It will be extremely helpful if you have a kitchen-specific set of tweezers to pick up the chocolate discs because you will find your fingers may melt these delicate decorations before they reach your cupcake.

Port Wine Chocolate Macaron
Chocolate macaron recipe adapted from Mad about Macarons!

Yield: 60 mini macaron or 40 medium macaron

Notes*

You will need a digital kitchen scale to make this recipe. They can be found very reasonably, I picked mine up for a whopping $10. I highly suggest the investment, it will open up a whole new world of recipes.

Age your egg whites by sealing the bowl containing your separated egg whites with plastic wrap and punching a few holes for ventilation. Refrigerate for at least 24 hours or up to 7 days.

Ingredients:

For the Chocolate Macaron
  • 150 g egg whites, aged, at room temperature
  • 100 g superfine sugar (caster, berry)
  • 180 g ground almonds
  • 270 g icing sugar (confectioners', powdered)
  • 10 g unsweetened dark cocoa powder (callebaut, guittard, cocoa barry)
  • Edible dried petals (optional)


For the Port Wine Ganache
  • 1/4 cup heavy whipping cream
  • 1 teaspoons white corn syrup
  • 3 tablespoons port wine
  • 4 1/2 ounces dark chocolate, finely chopped
  • Red gel food colouring (optional)


Instructions:

For the Macaron

1. With paper towel wipe down your mixer bowl and whisk attachment with lemon juice or vinegar to remove any trace of fat, oil or soap. Rinse with water and dry.

2. Line two baking sheets with perfectly flat parchment paper or silicone baking mats if you have them.

3. Place the ground almonds and icing sugar into a food processor and pulse on and off for 30 seconds to incorporate and reduce any large pieces of almond.

4. In a large bowl sift the icing sugar, ground almonds and cocoa powder three times or more if your arm is strong enough. Discard any large coarse pieces of ground almonds. If there are a lot of pieces to discard weigh them and replace with more ground almonds. Or alternatively you can grind the coarse almonds in a spice/coffee grinder until they can be sifted. 

3. Whisk egg whites (at room temperature) in stand mixer until soft peaks form. While the mixer is running at medium-high speed ("6" on a KitchenAid) sprinkle in sugar a tablespoon at a time. Scrape down sides of bowl to fully incorporate.

4. Whisk on high ("8" on a KitchenAid) until you mixture turns glossy and reaches stiff peak stage.

5. Combine 1/2 of the dry mixture into the egg white mixture. Mix well, there is no need to carefully fold the mixture at this point.

6. Add second 1/2 of the dry ingredients to the bowl and begin your macronnage. Scrape the bottom of the bowl, turn the batter upside down and plop it on the top. Alternate this technique with swiping the batter against the side of the bowl several times and then scraping the side of the bowl and plopping the batter on top. The best way to tell when your batter is ready is by scooping a spoonful of batter and letting it drop back into the bowl. If it slowly drops back into the bowl, lands on the batter in a small mound and slowly sinks back into the batter, then you are done.

7. Transfer the mixture to a piping bag with a plain tip. An 804 (1 cm opening) pastry tip will work best but a plain tip size 10 or higher can also be used. Ensure you turn down the top cuff of the bag before filling. This will make the process of filling the bag a lot less messy.

8. On tray, pipe out 2 cm rounds of batter to make mini macaron. For medium macarons pipe to 3 cm in diameter. Leave 4 cm between piped rounds. Lay a dishcloth on your counter and rap the tray firmly against the counter top a few times. Don't be afraid to really give them a BANG! This will help the macaron's peaks sink in. You may need to rap the tray in between piping rows because the macaron can set within a minute. To decorate place dried flower petals onto 30 or half of the piped rounds. 

9. Leave trays out at room temperature for 30 minutes to an hour. This will help the feet (pieds) to form.

10. While the macaron are setting, preheat your oven to 300° F (150° C). Reduce the temperature to 250° F (120° C) and bake your macaron in the center of the oven, one tray at a time, for about 15 - 20 minutes. Test after 12 minutes. If you touch the top of the macaron and there is a wobble continue baking for 5 - 6 minutes longer until firm. Remove from oven and let cool on trays.

11. Marry up the shells in similar sized pairs, one with petals and one with out. Fill a piping bag or Ziploc bag with the Port Wine Ganache and pipe a small amount into the center of one shell. Place its partner on top, using a circular motion to gently squish filling to but not over the edges of the macaron.


For the Port Wine Ganache

1. Place finely chopped chocolate into a small bowl.

1. In a small pot, bring cream and corn syrup to a simmer over medium heat, stirring with a spatula.

2. Remove cream from heat, add a small amount of red gel food colouring and mix.

3. Pour cream mixture over chopped chocolate and let sit for 1 minute. Mix until melted. Add port wine and mix. Let cool at room temperature and store in refrigerator up to 2 weeks.

Chocolate Salted Caramel Cupcakes
Cake recipe adapted from Sweetapolita
Salted Caramel Sauce recipe adapted from Simply Recipes
Salted Caramel Buttercream recipe adapted from Two Peas and Their Pod

Yield: 20-24 cupcake or one 2 layer, 8" round cake


Notes*

You will have about 1/2 cup of salted caramel sauce leftover but I am sure you can solve this dilemma.

Ingredients:

For the Chocolate Cake
  • 1-1/2 cups all-purpose flour
  • 1-1/2 cups sugar
  • 1/2 cup unsweetened dark cocoa powder (callebaut, guittard, cocoa barry)
  • 1-1/2 teaspoons baking soda
  • 1-1/2 teaspoons baking powder
  • 1-1/2 teaspoons cornstarch
  • 1 teaspoon salt
  • 2/3 cup buttermilk
  • 1/2 cup brewed coffee or espresso, warm
  • 1/3 cup + 1 tablespoon vegetable oil
  • 2 eggs, room temperature, lightly beaten
  • 1 tablespoon pure vanilla extract
For the Salted Caramel Sauce
  • 2 cups sugar
  • 3/4 cup unsalted butter, room temperature, cut into cubes
  • 1 cup heavy whipping cream, room temperature
  • 2 teaspoons pure vanilla extract
  • 1 tablespoon fleur de sel or Maldon sea salt flakes
For the Salted Caramel Buttercream
  • 1 cup + 2 tablespoons unsalted butter, room temperature, cut into cubes
  • 3 cups icing sugar (confectioners', powdered)
  • 3/4 cup salted caramel sauce
Instructions:

For the Chocolate Cake

1. Preheat oven to 350° F (180° C). Line muffin pan with cupcake liners.

3. In a 2 cup measuring cup or medium bowl, combine the buttermilk, coffee, oil, egg and vanilla and whisk to combine.

2. In the bowl of an electric mixer sift the flour, sugar, cocoa powder, baking soda, baking powder, cornstarch and salt. Using the paddle attachment mix on low for 30 seconds.

4. Add the liquid mixture to the dry ingredients and mix for 2 minutes on medium speed. The batter will be very liquidy.

5. Divide the batter evenly among liners. Batter will reach 2/3 full or just less but do not fear, this batter rises a lot, you will have perfect flat-topped cupcakes. Bake for 15-17 minutes until tops feel stable or until a cake tester comes out clean when inserted into the center. Ensure to not over bake these delicate cakes! Immediately remove cupcakes from muffin pan to cool on racks and let cool completely.

6. Time to fill your cupcake! Using a small pairing knife cut a 3 cm cone out of the top of the cupcake. You want your cone to be fairly deep but not through the bottom of the cake! Fill your cupcake with 1 teaspoon of Salted Caramel Sauce. Cut the bottom tip off the cupcake cone and replace the top of the cupcake.

7. Frost with Salted Caramel Buttercream using desired tip and decorate with your Port Wine Macaron, chocolate disc and 3 Callebaut CrispearlsCover and store at room temperature for up to 2 days or in the refrigerator up to 5 days (eaten at room temperature). Best eaten the same day as baked.

For the Salted Caramel Sauce

1. Ensure you have all of your ingredients in place. Making caramel is a fast process so have your butter and cream ready to go by the stove. And be careful!

2. Heat the sugar over medium-high heat in a heavy bottom 2-quart or 3-quart saucepan. Continuously stir the sugar as it begins to melt with a wooden spoon or whisk. As soon as the sugar comes to a boil stop stirring. You can swirl the pan to distribute the heat from this point on. Watch for your sugar to turn an amber colour, this can take from 10 seconds to 1 minute depending on the heaviness of your pan.

3. Once the amber colour is reached immediately add the butter and whisk until melted.

4. Remove the pan from the heat and count to three, then very slowly add the cream and continue to whisk until incorporated. A note that when you add the butter and especially the cream the mixture will foam up vigorously, that is why you need to use a larger pan.

5. Add the salt and stir at least 1 minute to incorporate. Let cool 10 minutes and pour into a glass mason jar and let cool at room temperature. Store in the refrigerator for up to 2 weeks.


For the Salted Caramel Buttercream

1. In the bowl of an electric mixer fitted with the paddle attachment, whip butter for 6 minutes on medium speed. Butter will become fluffy and pale.

2. Add icing sugar and mix on low speed until combined, then on medium-high speed for 1 minute. Turn off mixer and add the salted caramel sauce. Beat on low until combined and beat another 3 minutes on medium high until frosting is light and creamy.

3. Best used right away.

Thanks so much for reading! Hope you enjoy these chocolate delights.

xoxo Melissa

April 23, 2013

VANILLA PISTACHIO CUPCAKES WITH ROSE WATER MACARON

1 comment:
Vanilla Pistachio Cupcake

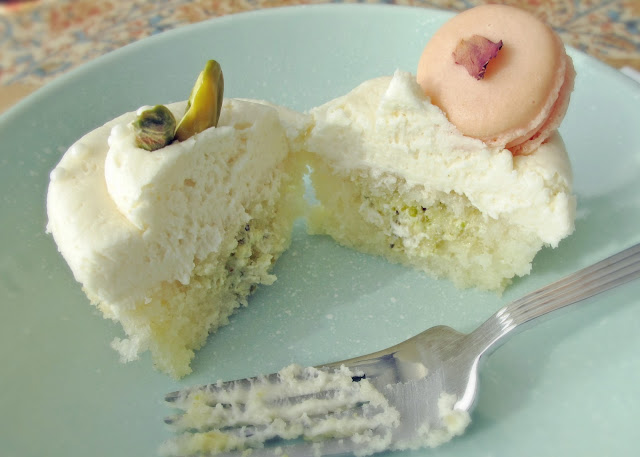
When deciding what trio of flavours I was going to make for the fundraising Paris-inspired cupcakes, I knew that a vanilla cake with vanilla buttercream was a people-pleasing must. Taking from French pastry inspiration I decided to fill it with a pistachio buttercream and then my interests in Moroccan and Algerian flavours led me to the pair it with a rose water macaron.

Vanilla Pistachio Cupcake

Rose water can be found in stores that carry Middle Eastern food products. This amazing flower essence infused water is imported from Lebanon. If you do pick some up I suggest you also buy the orange blossom water which will likely be on the same shelf.


Vanilla Pistachio Cupcake

The pistachio filling was made by mixing pistachio paste with my Fluffy Mom Frosting which is a vanilla buttercream. Pistachio paste can be purchased but it is expensive and hard to find. It is used in quite a few french pastries including pistachio jaconde which is a sponge cake used in many entremet. Since I plan on tackling some entremet soon I decided to try and make the paste on my own.


Rose Water Macaron

There are already many amazing tutorials online for macarons. I've added links to two great french meringue macaron tutorials here and here. I recommend watching this video to understand the important technique of macronnage.

I definitely had my share of hiccups preparing the macarons but even thou the 'pieds' may be a little big or the tops may have coloured slightly, in the end they are all delicious!

I hope you enjoy these recipes and give them a try alone or together. Just remember to spread the recipes out over a couple of days starting with ageing the egg whites. The macarons will also benefit from a few days in the fridge to meld and intensify the flavours before topping your delightful cupcakes.


Rose Water Macaron
Basic macaron recipe adapted from Mad about Macarons!

Yield: 60 mini macaron or 40 medium macaron

Notes*
You will need a digital kitchen scale to make this recipe. They can be found very reasonably, I picked mine up for a whopping $10. I highly suggest the investment, it will open up a whole new world of recipes.

Age your egg whites by sealing the bowl containing your separated egg whites with plastic wrap and punching a few holes for ventilation. Refrigerate for at least 24 hours or up to 7 days.

Ingredients:

For the Basic Macaron
  • 150 g egg whites, aged, at room temperature
  • 100 g superfine sugar (caster, berry)
  • 180 g ground almonds
  • 270 g icing sugar (confectioners', powdered)
  • Gel food colour, pink and ivory
  • Edible dried rose petals (optional)
For the Rose Water Ganache
  • 1/2 cup heavy whipping cream
  • 2 teaspoons white corn syrup
  • 2 teaspoons rose water
  • 4 ounces white chocolate, finely chopped
  • 1 tablespoon butter
  • Gel food colour, pink and ivory
Instructions:

For the Basic Macaron

1. With paper towel wipe down your mixer bowl and whisk attachment with lemon juice or vinegar to remove any trace of fat, oil or soap. Rinse with water and dry.

2. Line two baking sheets with perfectly flat parchment paper or silicone baking mats if you have them.

3. Place the ground almonds and icing sugar into a food processor and pulse on and off for 30 seconds to incorporate and reduce any large pieces of almond.

4. In a large bowl sift the icing sugar and almond mixture three times. Discard any large coarse pieces of ground almonds. If there are a lot of pieces to discard weigh them and replace with more ground almonds. Or alternatively you can grind the coarse almonds in a spice/coffee grinder until they can be sifted. 

3. Whisk egg whites (at room temperature) in stand mixer until soft peaks form. While the mixer is running at medium-high speed ("6" on a KitchenAid) sprinkle in sugar a tablespoon at a time. Scrape down sides of bowl to fully incorporate.

4. Whisk on high ("8" on a KitchenAid) until you mixture turns glossy and reaches stiff peak stage.

5. Add the food colour to the meringue, 3 parts pink to 1 part ivory. Continue whisking on high about 30 seconds, scrapping sides as necessary until colour is incorporated.

6. Combine 1/2 of the dry mixture into the egg white mixture. Mix well, there is no need to carefully fold the mixture at this point.

7. Add second 1/2 of the dry ingredients to the bowl and begin your macronnage. Scrape the bottom of the bowl, turn the batter upside down and plop it on the top. Alternate this technique with swiping the batter against the side of the bowl several times and then scraping the side of the bowl and plopping the batter on top. The best way to tell when your batter is ready is by scooping a spoonful of batter and letting it drop back into the bowl. If it slowly drops back into the bowl, lands on the batter in a small mound and slowly sinks back into the batter, then you are done.

8. Transfer the mixture to a piping bag with a plain tip. An 804 (1 cm opening) pastry tip will work best but a plain tip size 10 or higher can also be used. Ensure you turn down the top cuff of the bag before filling. This will make the process of filling the bag a lot less messy.

9. On tray, pipe out 2 cm rounds of batter to make mini macaron. For medium macarons pipe to 3 cm in diameter. Leave 4 cm between piped rounds. Lay a dishcloth on your counter and rap the tray firmly against the counter top a few times. Don't be afraid to really give them a BANG! This will help the macaron's peaks sink in. You may need to rap the tray in between piping rows because the macaron can set within a minute.

11. To decorate place a piece of dried rose petal onto 30 or half of the piped rounds. Alternatively splatter macarons with pink food colouring by dipping a flat bristled paint brush into food colouring and using the end of your finger, hold the bristles back and flick colour onto rounds.

11. Leave trays out at room temperature for 30 minutes to an hour. This will help the feet (pieds) to form.

12. While the macaron are setting, preheat your oven to 300° F (150° C). Reduce the temperature to 250° F (120° C) and bake your macaron in the center of the oven, one tray at a time, for about 15 - 20 minutes. Test after 12 minutes. If you touch the top of the macaron and there is a wobble continue baking for 5 - 6 minutes longer until firm. Remove trays from oven and let cool on trays.

13. Marry up the shells in similar sized pairs, one with a rose petal and one with out. Fill a piping bag or Ziploc bag with the Rose Water Ganache and pipe a small amount into the center of one shell. Place its partner on top, using a circular motion to gently squish filling to but not over the edges of the macaron.

For the Rose Water Ganache

1. Place finely chopped chocolate into a small bowl.

1. In a small pot, bring cream, corn syrup and rose water to a simmer over medium heat, stirring with a spatula.

2. Remove cream from heat and add gel food colouring using 3 parts pink to 1 part ivory, mix until desired colour is reached.

3. Pour cream mixture over chopped chocolate and let sit for 1 minute. Mix until melted and then add in butter and mix until incorporated.

Vanilla Pistachio Cupcakes
Cake recipe adapted from Rose Levy Barenbaum
Pistachio Paste recipe adapted from Pierre Herme

Yield: One 2 layer, 8" round cake or 20-24 cupcake

Notes*
To make the Pistachio filling you will need a digital kitchen scale and a candy thermometer. The Cake Box cake was also used to make these delicious Easter treats.

Ingredients:

For the "Cake Box" Cake
  • 5 large egg whites, at room temperature
  • 1 cup whole milk, at room temperature
  • 2 teaspoons pure vanilla extract
  • 1/2 teaspoon pure almond extract
  • 3 cups cake flour, sifted
  • 1 3/4 cups sugar
  • 1 tablespoon + 1 teaspoon baking powder
  • 3/4 teaspoon salt
  • 6 tablespoons unsalted butter, at room temperature and cut into cubes
  • 6 tablespoons vegetable shortening, at room temperature and cut into cubes
For the Fluffy Mom Frosting
  • 1 1/2 cups + 2 tablespoons butter, at room temperature
  • 3 cups icing sugar, sifted (confectioners', powdered)
  • 2 tablespoons milk
  • 2 teaspoons pure vanilla extract
  • 1/4 teaspoon salt
For the Pistachio Filling
  • 125 grams shelled pistachios, unsalted
  • 30 grams ground almonds
  • 60 grams sugar
  • 1 tablespoon + 1-2 teaspoons water
  • 2 drops almond extract
  • 1/2 cup Fluffy Mom Frosting
Instructions:

For the "Cake Box" Cake

1. Preheat oven to 350° F (180° C). Line muffin pan with cupcake liners.

2. In a 2 cup measuring cup, combine the egg whites, 1/4 cup of milk, vanilla and almond extract and stir with a fork. Set aside.

3. In the bowl of an electric mixer fitted with the paddle attachment combine the flour, sugar, baking powder and salt together on low speed ("stir" on a KitchenAid) for 30 seconds.

4. Add the butter, shortening and remaining milk and mix on low speed until just moistened. Increase to medium speed ("4" on a KitchenAid) for 1 1/2 minutes. Scrape the sides of the bowl and begin to add the egg mixture in 3 separate batches; beat on medium for 20 seconds after each addition.

5. Fill the cupcake liners 3/4 full for a domed peak or 2/3 full for flat tops.
Bake 12-16 minutes until tops feel stable or until a cake tester comes out clean when inserted into the center. Ensure to not over bake these delicate cakes! Check after 12 minutes, but not before, and check in 2 minute intervals until done. Immediately remove cupcakes from muffin pan to cool on racks and let cool completely.

6. Time to fill your cupcake! Using a small pairing knife cut a 3 cm cone out of the top of the cupcake. You want your cone to be fairly deep but not through the bottom of the cake! Fill your cupcake with 1 teaspoon of Pistachio filling. Cut the bottom tip off the cupcake cone and replace the top of the cupcake.

7. Frost with Fluffy Mom Frosting using desired tip and decorate with your Rose Water Macaron, 2 pistachio halves and 3 white dragees. Cover and store at room temperature for up to 2 days or in the refrigerator up to 5 days (eaten at room temperature). Best eaten the same day as baked.

For the Fluffy Mom Frosting

1. In the bowl of an electric mixer fitted with the paddle attachment, whip butter for 8 minutes on medium speed ("4" on a KitchenAid). Butter will become fluffy and pale.

2. Add remaining ingredients and mix on low speed for 1 minute, then on medium-high speed ("6" on a KitchenAid) for 3 minutes. Frosting will be very light, creamy and fluffy.

3. Best used right away.

For the Pistachio Filling

1. In a spice/coffee grinder, grind the pistachios until you reach a fine paste. You might have to do this in batches depending on the size of your grinder. And grind ground almonds in spice/coffee grinder to reduce coarseness. Combine ground nuts in a medium bowl and mix.

2. In a small saucepan mix water with sugar and simmer over medium high heat until mixture reaches 250° F (120° C). Pour the scalding hot sugar over the nuts and quickly mix with a spoon to prevent crystallisation.

3. Once the mixture has cooled slightly begin to knead it with your hands. Carefully add water 1/2 teaspoon at a time until a marzipan-like texture is reached.

4. In a separate bowl mix 2 tablespoons pistachio paste with 1/2 cup Fluffy Mom Frosting.

I hope you tackle these beauties, they are worth it. I will have to try these recipes in cake form, imagine that!

xoxo Melissa

April 22, 2013

OH MON CHERI, I LOVE PARIS! MACARON CUPCAKES

No comments:
Macaron cupcakes via Fine Motor Skills

Bonjour! Last year at this time I was in Paris. Sigh.

I did not have the same level of appreciation for pastry then but I did manage a visit to Laduree and many, many, MANY other less notable but no less delicious patisseries.

Chocolate Macaron via Fine Motor Skills

As I've been absorbing different styles of pastry and decoration it has been hard not to fall in love with French pastry. Ooh la la, it is my new obsession. These cupcakes include little if any traditional French techniques but they are inspired by them.

One of the reasons I love French decoration in particular is because it is all very edible. The chocolate, tuile and spun sugar decorations the French use make my taste buds tingle upon sight. Although I love gumpaste and its amazing versatility I've found the texture can be overwhelming on top of a tiny sweet.

French pastries, like entremet, are often extremely complicated with numerous ingredients and steps but the outcomes are always beautifully refined. These cupcakes are far from masterpieces of refinement however I do love the informality of the cupcake combined with the complexity of the decorations. It keeps the fussiness in check and creates a sense of casualness. And the edible dried flowers add that touch of organic imperfection that I love in any form of design. Okay, I'm hyper-analyzing now. They are just cupcakes for heaven's sake.

Macaron cupcakes via Fine Motor Skills

No, I did not eat all of these cupcakes. They were made for a fundraising bake sale to support the Canadian Cancer Society and this month's Daffodil campaign. Needless to say I jumped at the opportunity to make a ton of cupcakes for a great cause.

Macaron cupcakes via Fine Motor Skills

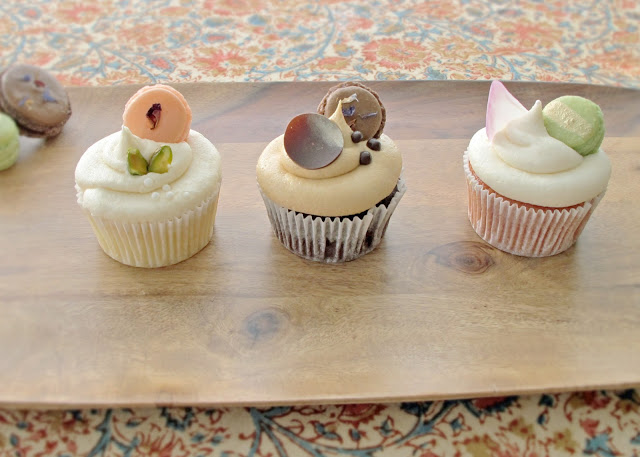
Now for the introductions, starting on the left is the Vanilla Pistachio Cupcake with Rosewater Macaron, center is the Salted Caramel Chocolate Cupcake with Port Wine Macaron and to the right is the Fresh Strawberry and Creamcheese Cupcake with Kusmi Tea Macaron. Because the cupcakes involve three to four different recipes each, I will create separate posts with recipes and tutorials for each one. For now lets just look at some pretty pictures and go into a little more detail.

Vanilla Pistachio Cupcake

The Vanilla Pistachio Cupcake with Rosewater Macaron is made with my favourite Cake-box Cake and Fluffy Mom Frosting recipe and has a pistachio buttercream filling. It is accompanied with a classic french macaron sandwiched with a rosewater-infused white chocolate ganache.

Chocolate Caramel Cupcake via Fine Motor Skills

The Salted Caramel Chocolate Cupcake with Port Wine Macaron was my favourite flavour-wise. It is a decadent chocolate cake with salted caramel filling and is topped with a salted caramel buttercream. The chocolate macaron is sandwiched with a port-infused dark chocolate ganache. It is decorated with a chocolate disc brushed with gold luster dust and Callebaut Crispearls


Strawberry Creamcheese Cupcake via Fine Motor Skills

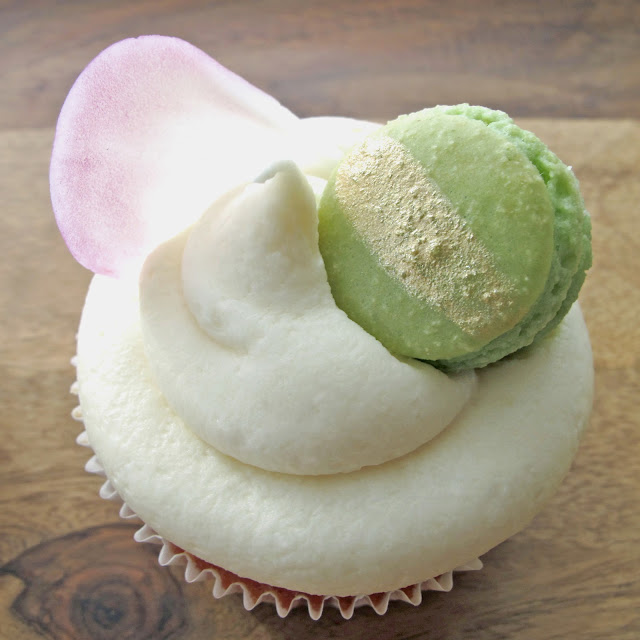
The Fresh Strawberry and Creamcheese Cupcake with Kusmi Tea Macaron is my favourite visually. It is a strawberry cake made with a strawberry reduction for a potent and delicious natural flavour. It is topped with a classic creamcheese buttercream. I decided not to add a filling because I wanted the two main flavours to mingle on their own. The macaron is brushed with gold luster dust and sandwiched with a Kusmi tea-infused white chocolate ganache. It is decorated with a delicate pink dusted, white chocolate petal.

Kusmi Tea via Fine Motor Skills

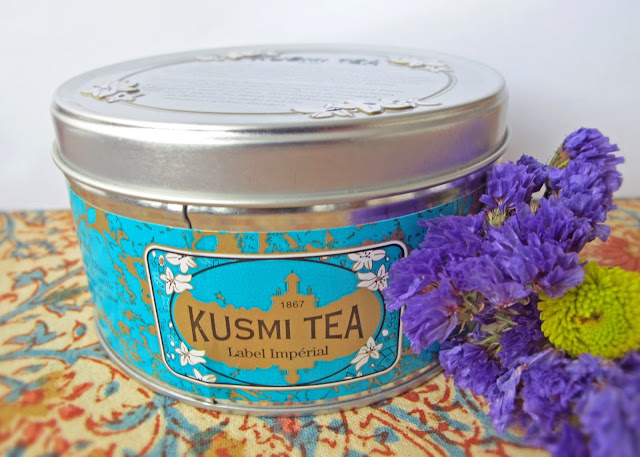
I picked up this Kusmi Tea in Paris but it can be found in many specialty gourmet food retailers around the world. I had not heard of Kusmi tea at the time but I remember I was drawn like a magnet to their delightful storefront in Montmartre. I used the Imperial blend, it is a wonderfully floral and complex green tea.


The making of these cupcakes was a three day, painfully pretty process that was not without its hiccups. Day one was making the pastes, sauces and ganaches (made caramel three times, burned twice), as well as started my egg whites ageing for the macarons. Day two was macaron madness, I'll get into that in the recipe posts. And day three was making the cake, buttercreams and final decorations. Intensive but sooo much fun.

I hope you enjoyed this bit of Parisian inspiration. Recipes will be up soon!

xoxo Melissa
Related Posts Plugin for WordPress, Blogger...