December 02, 2013

WINTER COOKIES + SUGAR COOKIE & ROYAL ICING RECIPES

2 comments:
Winter Cookies

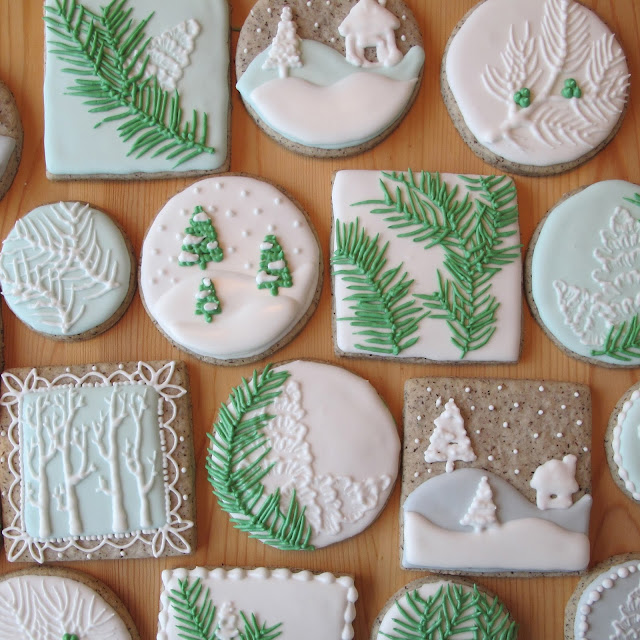
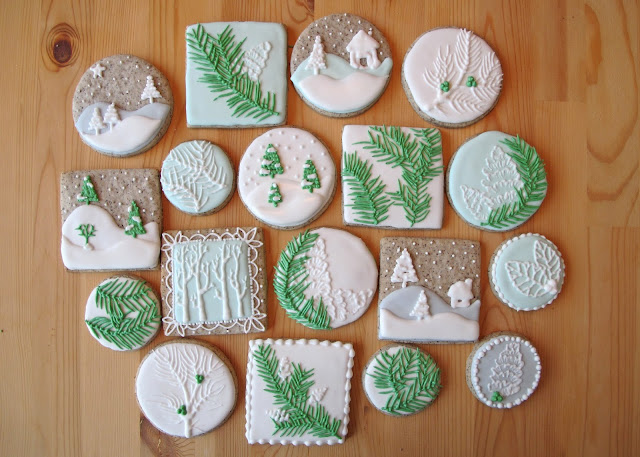
Sometimes you need to make Christmas cookies but you don't want them to be too 'Christmasy'. So here are some ideas for when winter is here but Christmas is still a ways around the corner. I'm also finally sharing the cookie and royal icing recipes I like to use. I think I mentioned posting these about 8 months ago. Whoops.


Winter Cookies

These cookies were made gluten-free and were equally delicious! The recipe below can be used with regular flour or gluten-free cup-for-cup flour. I used an all-purpose gluten-free cup-for-cup flour from local Cloud 9 specialty bakery. It contains a bit of buckwheat which is what gives the cookies their lovely speckled appearance. 

Winter Cookies
Flooded Cookies

Here is a great video on how to flood cookies. I use the same consistency she suggests of a 14-16 count icing as well as using a #3 or #4 icing tip. If you are a pattern-maker/baker like me you might also recognize her icing "tool". Why its an awl! You can wash and scrub yours or else a toothpick will do in a snap.


The brush embroidery pine cone with pine branches was one of my favourite designs. You can find a great video for the brush embroidery technique here.

One note about this cookie recipe is that it is very tender due to the use of icing sugar. This makes it melt in your mouth delicious but also a bit delicate and crumbly. 

Cut Out Sugar Cookies
Recipe Adapted from Sweet Adventures of Sugarbelle

Yield: About 2 dozen

Ingredients
  • 1 cup unsalted butter, room temperature
  • 1 1/2 cups icing sugar
  • 1 large egg
  • 1 tsp almond extract
  • 2 1/2-2 3/4 cups all-purpose flour
  • 1 tsp salt
Instructions

1. Preheat oven to 350° F (180° C).

2. Cream butter and icing sugar together in the bowl of your stand mixer using the paddle attachment for 2 minutes.

3. Lightly beat the egg in a small bowl with the almond extract. Add to the butter mixture and beat on medium until incorporated.

4. Sift the flour and salt into a medium bowl and then add gradually to the butter egg mixture until most of the dough sticks to the paddle. You know enough flour has been added when you can press the dough without any sticking to your finger. Wrap in plastic and refrigerate for 20 minutes.

5. Roll out dough onto parchment paper to a 1/4" thickness and cut out desired shapes. Place on cookie sheet and place in freezer for 10 minutes.

6. Remove tray from freezer and bake cookies for 10-12 minutes. Watch carefully to ensure your cookies do not brown. Let cookies cool completely before decorating.

*Notes

I decorate these cookies a day later because they are very tender and can use a little drying out. Once cool place them in a sealed container to rest. Of course day-of will do in a pinch and be extra melty.

Perfect Royal Icing

Ingredients
  • 3/4 cup warm water
  • 5 tbsp meringue powder (I use Wilton)
  • 1 tsp cream of tartar (only if not using Wilton)
  • 1 kg icing sugar
Instructions

1. In the bowl of your stand mixer, whisk the warm water and meringue powder together by hand until frothy or for about 30 seconds.

2. Dump Pour icing sugar into the mixing bowl and place on mixer with the paddle attachment. Mix on the lowest setting for 10 minutes, stopping mixer early to scrape down sides once. The icing will thicken and become creamy.

*Notes

This icing needs to be thinned with warm water to a piping or flood consistency. My preferred piping consistency is like toothpaste and my flood is a 14-16 count icing. What is a 14-16 count icing? Drop a blob of icing back into the bowl and count the number of seconds it takes for it to completely meld back into the icing.

Tint your icing with gel food colourings. I like to use tiny amounts of ivory and black to neutralize and soften most colours.

Icing will crust quickly when exposed to air so get it in a sealed container toot suite. Icing will keep in a sealed container at room temperature for 2 weeks. 

Oh look, some hiking.

Baden Powell

This was at the end of October. What spectacular weather we had this Fall. Here we're heading over the Eagle Bluffs on Cypress Mountain and following the Baden Powell trail down to Horseshoe Bay.

Baden Powell

This is likely covered with snow now, sigh. But almost time to strap something to my feet and slide down the side of a mountain! I'm thinking about switching to skiing this year... Hope you're excited for winter too!

xoxo Melissa

September 23, 2013

JAPANESE BERRY SHORTCAKE

2 comments:
Japanese Shortcake

I offered and then, to my delight, was requested to make this Japanese-style strawberry shortcake (due to allergies I replaced the classic strawberries for a mix of raspberries and blueberries).This lovely summery cake is also known as Japanese Christmas Cake... wha? This cake does not evoke joyous holiday feelings for me but okay, okay the colours I get. Ya? Ya, okay. 

Japanese Shortcake

This is loaded with all kinds of goodness I cannot eat, hmph, beyond that this was once upon a time my favourite sort of cake. A simple sponge with lots of fresh fruit and a light whipped cream accompaniment. If this cake wasn't for a 4 year old's birthday I would have most certainly laced the sugar syrup with a healthy dousing of Grand Marnier or St. Germain.

Japanese Shortcake

A Japanese strawberry shortcake is more like a light, fluffy, moist, bliss-filled genoise sponge rather than the classic dense (yet still delicious) British shortcake. The cake comes together a little like a choux pastry in that you melt the butter and mix the flour into the pot, be prepared, this produces an incredibly mouth-watering aroma. Also be warned this 4 layer 8" cake requires a dozen eggs. Twelve eggs lay in all their glory inside that cake. Why it's positively protein packed!

Japanese Shortcake

This picture makes me giggle because I was so excited when I found young shoots in my bundle of fresh mint. "How lucky", I thought. "Its micro mint!", I exclaimed. In the car on the way to the party, with the cake balanced precariously on my lap, I decided to taste said micro mint and received a piercing mouthful of bitter field weed. I'm not sure if you've ever eaten weed? But as soon as I tasted that chlorophyll punch various childhood memories of eating inedible plants came flooding back. Its like natures slap in the face "don't eat that you idiot!" So let me tell you the flavour is absolutely ghastly, needless to say I picked them off tout suite.

Japanese Shortcake

Here's the cake all gussied up for the birthday with some easy paper print-outs and a simple glitterified number four. Some times I wonder if the gum paste decor is really worth it? People still go nuts over paper and it takes about a 10th of the time. It was a race car theme by the way, Cars actually, but I decided to go for the more forward and unique '4 year old boys birthday meets 33 year old girls wedding' look.

No special notes for this recipe, she's mighty straight forward. Oh, just please buy a scale.

Japanese Berry Shortcake 
Recipe adapted from Bisous A Toi

Yield: One 4 layer 8" round cake

Shortcake Ingredients
  • 200g cake flour (no substitutes!)
  • 30g corn starch
  • 2 eggs whole
  • 10 egg yolks
  • 130g whole milk
  • 10 egg whites
  • 200g berry sugar (caster, super fine)
  • 1/2 tsp salt
Shortcake Instructions

1. Preheat oven to 320° F (160° C) and grease, flour and parchment line two 8" round cake pans.

2. Lightly whisk the two whole eggs together with the yolks.

3. Sift the flour and cornstarch together three times to ensure a light and fluffy cake.

4. Heat butter and milk in a medium saucepan until melted and slightly warm. Do not boil mixture. Remove pan from the heat and add the flour mixture into the pot and stir with a wooden spoon until smooth.

5. Transfer the mixture to a very large bowl and add in the egg yolk mixture and stir until combined.

6. In the very clean bowl of a stand mixer, whisk the egg whites on med-high until frothy. Sprinkle in the salt and then sprinkle in the sugar in three increments as the egg whites are whisking on medium. Return to med-high and whisk until you reach soft peaks.

7. Pour 1/3 of the egg white mixture into the batter mixture and fold to lighten the batter. Pour the remaining 2/3 of the egg white mixture in and fold gently until no egg white streaks remain.

8. Pour the batter evenly into the two prepared pans (I like to weigh mine to make sure they are even). Lift the pans an inch or so off the counter and drop the pans a couple of times to release some of the air bubbles.

9. Place a 1/2 sheet pan in the oven on the middle rack. The two 8" cake pans should fit inside the pan side-by-side. Using a measuring cup, fill the sheet pan with water. Bake for 40-45 min or until the top springs back at your touch.

10. Remove the cakes from the oven and let cool 10 minutes in the pans. Cakes will pull away considerably from the sides. Carefully place the cakes onto cooling racks and let cool completely. Once cool wrap in plastic wrap and store at room temperature one day or in the refrigerator two days.

Stabilized Whipped Cream Ingredients
  • 2 tsp gelatin 
  • 8 tsp cold water
  • 2 cups whipping cream, cold
  • 1/2 cup icing sugar, sifted
  • 1 tsp vanilla
Stabilized Whipped Cream Instructions

1. Place the whisk and bowl of your mixer into the freezer for 10 minutes to chill.

2. Put the cold water into a small saucepan and sprinkle the gelatin evenly over the surface. Let stand for 5 minutes.

3. Place the saucepan over low heat and stir constantly with a wooden spoon until gelatin is just dissolved. Remove from the heat and let cool to room temperature.

4. Remove mixing bowl and whisk from freezer and add in the whipping cream, sifted icing sugar and vanilla and whisk on high until slightly thickened. With mixture on medium gradually pour the gelatin into the whipping cream. Return the mixture to high and whisk until you reach medium peaks.

Sugar Syrup Ingredients
  • 1/4 cup granulated sugar
  • 1/4 cup water
  • 1-2 tbsp Grand Marnier, St. Germain, optional 
Sugar Syrup Instructions

Combine sugar and water in a small saucepan over med-high heat and heat until sugar has dissolved. Remove from heat and stir in optional liqueur. Let cool to room temperature.

Assembly Ingredients
  • 18 oz raspberries/blueberries or 1 1/2 pints strawberries
Assembly Instructions

1. Reserve a few of the prettiest berries to decorate the cake. Portion the remaining berries into thirds. If using strawberries dice the remaining berries and macerate with a sprinkling of berry sugar and divide into thirds.

2. Slice each sponge cake into 2 layers. Place one cake layer cut side up on a cake board or plate and lightly soak the surface with the sugar syrup. With an off-set spatula spread a thin layer of the whipped cream over the cake layer. Sprinkle a third of the berries over the whipped cream making sure to place some at the edges of the cake. Spread a thicker layer of whipped cream over the berries and top with another cake layer. Repeat these steps for the next two layers. Syrup, whip, berry, whip.

3. Place the cake in the refrigerator and let chill for 30 minutes to set the whipped cream. Assemble the cake the day of for best flavour.

4. To decorate, sprinkle the top of the cake with a heavy dusting of icing sugar. Pile the berries in the center and garnish with chopped pistachios, dried flowers or lavender and sprigs of mint. It also looks great if you toss some icing sugar and garnish on to the sides of the cake for a rustic look.

Sorry for my slow posts, I think I've got another pattern brewing so stay tuned!

xoxo Melissa

August 08, 2013

LAZY LADY POST #1

1 comment:
These 'Lazy Lady' posts will contain no helpful or functional content they are just me strutting my stuff around with a few lazy side notes.


This cake for a friend took ages but was so much fun to make! This was my first tiered and smooth buttercream cake. I learned many things.

The design inspiration started with 'craft beer' and then turned into this and then I added flags because I like everything to be cute and figure everyone else must feel the same on some level.

The bottom tier is a chocolate cake with raspberry mousse and the top tier is a vanilla sponge tiramisu. I made the top decoration oh, I'd say about 4 times! In the end I used gumpaste for the topper, modeling chocolate for the little flags and a mix of gumpaste and modeling chocolate for everything else. I loved learning how to work with modeling chocolate because it is soft, tasty and edible as opposed to rock hard gumpaste. I also learned how to make mascarpone (hooray!) whilst discovering I am lactose intolerant (oh, how unfortunate). My world of pastry is currently reeling into an abyss of coconut milk and soaked cashews. This will take some adjustment time; excuse me while I go cry in the corner.


Le urbain jardin... shoulder pat.


A backyard bbq rib-fest provided by some amazing friends. I contributed a gluten-free, dairy-free, egg-free, refined sugar-free hippy-tastic peach and blueberry pie that was delicious? fantastic? absolutely scrumpdiddlyumptious? no, it was pretty good though. Thank goodness I am not allergic to everything like this pie is.


Oh, Naramata, what a magical place, a place so wondrous, bountiful, gentle and homey it induces my boyfriend to make the most delectable pies. We returned to the city a few days ago and I'm ready to go back to the country now.

Thanks for the bloggers indulgence.

xoxo Melissa

July 24, 2013

CALICO DIAMOND BABY QUILT WITH PATTERN

1 comment:

I adore how this folksy little baby quilt turned out and was so happy to hear the lovely parents-to-be enjoyed it too.


In a previous post, I covered the process of naturally dyeing some of the quilt colours. I love how understated the design is, its all like "hey baby" not all in your face like "HEY, CHECK IT OUT, DID YOU KNOW I AM TOTALLY FOR A BABY? CRAZY RIGHT?!".

Oh dear.

The quilt is backed with a hand-blocked cotton fabric made in India and available at Maiwa. I love the imperfections in the printing, it was the perfect compliment to this quilts handmade goodness.


I hadn't made this type of intricate quilt before and organizing the rows of colour to be in the right place at the right time was a little confusing. So there was a lot of numbering and quadruple checking before each trip to the machine but not without a little seam ripping. The alphabetized chart I've made for the pattern should make this process much easier.


I used Olympus brand sashiko thread for the quilting and wouldn't you know there is a wonderful local supplier of this rather specific item. Check them out, they are located in beautiful Gibsons BC, have great pricing and ship quick!


And just a bit more gratuitous quilt love.


I've never used a quilt pattern so I hope my rendition does the trick for most folks. Compared to clothing patterns I must say quilts are a cinch.

I didn't go into detail on creating and sewing binding as there are already so many great online tutorials. Here is one I used, I like Nancy Ellen because she does everything old school (OG). I chose to machine stitch the binding to the quilt front and hand stitch it to the back, just like Nancy.

Please download your Calico Diamond Quilt Pattern here!


Neil's friends introduced us to a super fabulous hike the other weekend to Marriot Lake near Pemberton, BC. This hike is like a secret nugget of gold so shhh, seriously, keep it down!


What a treat, you usually can't get these kinds of alpine vistas so close to the city, well relatively close, and the elevation was just right for a gal who hasn't run in months and practices intermittent yoga.


Happy sewing and happy summering!

xoxo Melissa

July 14, 2013

DYEING WITH NATURAL PLANT DYES

2 comments:

One of the most illuminating courses from my long ago postgraduate education was textile design.

I may have said it already but I LOVE FABRIC. I have a healthy respect for a well made piece of cloth. The content of a fabric is crucial but it certainly doesn't end there; the construction and finishing is what truly gives it, its sumptuous, forgiving and enhancing properties. Using plants creates a depth of colour you just can't achieve with synthetic dyes. There is just something about it.

I was inspired to return to natural dyeing when planning out my next quilt. I wanted to produce a less toxic, more natural and generally more human friendly baby quilt but I could not find solid colour organic quilting fabrics. After oggling Folk Fibers amazing quilts (if only I could sell a quilt for $4000) I decided to create the quilt using natural dyes. My plan was to use an organic base fabric but unfortunately and very disappointingly I could not find one so I opted for Snow coloured Kona cotton, my favourite off-white for quilts.

I picked up all the dye's at Maiwa which is a local store that sells a fantastic array of textile design supplies. Here is an inspiring guide to Maiwa's natural dyes and their indigo dyes. These guides will give you a thorough understanding of the process and how each dye must be handled uniquely.

When using natural dyes different colours are achieved through the complex combination of the type of mordant(s) used, amount of dye matter, length of steeping, layering of colours and even the temperature of the dye bath. After designing the quilt, of which I will share later, I realized I would need eleven colours, that's a lot! Hence the dork chart, aka colour coded Excel chart. Excel is an evil yet often necessary tool, at least the colour coding makes it pretty to look at.


Depending on the desired shade some colours get every bath like my attempt at black, as opposed to the light peach which was steeped in only three. As you can imagine the process took days but it was incredibly rewarding to see the colours progress. 


Watching the indigo oxidize is always a magical process.


And of course, like any good dyer, I kept a snippet of fabric from every step of the process to create a record for future endeavors.


I love the end results. It's like the colours are alive! Plus I get all romantic about preserving the use of ancient dye techniques. It makes me feel all, you know, connected and stuff.


Precautions need to be taken to not inhale any of the dye matters (ie. wear a mask, tie a piece of fabric around your face or at least hold your breath). Working with natural dyes still requires some harsher chemicals to help the dye adhere to the fabric; when preparing indigo one of them is lye. Super scary lye. Luckily you use minuscule amounts so a pair of gloves and careful movements will keep you safe.


Because I live in a rental box in the sky, and was not able to work in a garage or on the lawn on a sunny day, I took serious precautions to protect the kitchen from dye splatter. I covered almost all surrounding surfaces, including the incredibly porous white marble floors, with dropcloths. Yeesh.


In the end I was not able to achieve the black I needed for the planned design as it is a very difficult colour to accomplish with natural dyes. I am determined to try again though and think a super strong logwood bath with an iron mordant may do the trick. Because I wanted/needed/had to have black to complete the quilt vision I decided to buy it pre-dyed. Boo. But, hey I'll still give myself a pat on the shoulder.

Here are the final colours for the upcoming quilt.


And here is a sneak peek of the design coming together. Pretty!


We also recently took a camping trip to Whidbey Island. What a gorgeous place! I recommend it if you like amazing farmer's markets, historical forts, old-timey candy shops, alpacas and field filled vistas.


I hope you enjoyed this post. I know it's a pretty dry subject and the images not entirely appealing but I just enjoyed this process so much and wanted to share.

xoxo Melissa

July 09, 2013

JIMMY SHORTS WITH PATTERN

22 comments:
shorts with free pattern

Summer is officially here, time to celebrate it with some shorts!

shorts with free pattern

The Jimmy shorts are lined and pleated with a loose fit. There are handy side pockets for introvert comfort, a fly zipper and a pant hook waist closure. They aren't high-waisted, I would call them a regular rise. The fit could be considered slightly "man-repelling" however they are certainly short enough to make up for it and I love a blouse-y short right now.

jimmy shorts with free pattern

I decided to try my hand on a bit of beading. I used silver glass beads and beaded over the fabric pattern. These shorts give such a lovely sparkle in the sunlight. The sparkle from glass is just oh, so much nicer than the sparkle from say plastic sequins. If you do try out some beading make sure to leave at least a 1" gap from any seams or areas of topstitching.

beading shorts

It took 10 hours to bead the two front and two back panels. Yikes. Luckily I was able to do about 2 hours of it with this lovely view. 

david lam park

This fuschia pair is made from a lovely breathable linen. You might recognize them from the previous Elise Tee post. Thanks for all the encouraging comments on getting this pattern out!

jimmy shorts with free pattern

What a catalogue shot.

jimmy shorts with free pattern

I have a greater understanding of why I created super simple patterns previously because this one took forever! Expect a return to simplicity.


jimmy shorts with free pattern

Happy sewing!

xoxo Melissa
Related Posts Plugin for WordPress, Blogger...